10 Eye-catching Bead Tapestry Patterns You’ll Love
Bead tapestry crafts turn simple beads into colorful pieces of art, and I love how every pattern can bring a completely different personality to a space. From playful characters and rainbow hearts to flowers, birds, and bold retro designs, there’s plenty of inspiration to explore.
These projects are also a satisfying way to experiment with colors and patterns while creating something by hand. Here are 10 eye-catching bead tapestry patterns that may inspire your next creative afternoon at home.
1. Ghost Face Pink Bead Tapestry
Description
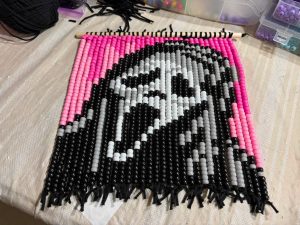
This striking bead tapestry recreates a haunting ghost face using glossy black, white, and gray beads against a vivid pink background. Long vertical strands create a textured curtain effect, while the contrasting shades define the dramatic eyes and open mouth. Mounted on a simple wooden dowel, the finished piece makes an expressive handmade decoration for bedrooms, studios, or Halloween displays.
Materials
- Pony beads in black, white, gray, hot pink, and light pink
- Black cord or sturdy beading string
- Wooden dowel
- Scissors
- Measuring tape or ruler
- Printed or hand-drawn ghost face pattern
- Bead sorting containers
- Optional hanging cord
Step-by-Step Guide
Step 1: Create the Pattern
Sketch or print a pixel-style ghost face pattern. Divide the artwork into vertical columns so each square represents one bead.
Step 2: Sort the Beads
Separate black, white, gray, hot pink, and light pink beads into small containers. Keeping each shade organized makes following the pattern much easier.
Step 3: Prepare the Cords
Cut equal lengths of black cord for every vertical strand. Leave extra length at both ends for attaching and securing the beadwork.
Step 4: Attach Cords to the Dowel
Loop each strand securely around the wooden dowel. Space them evenly so the finished tapestry hangs straight without large gaps.
Step 5: Add the Background Beads
Begin threading pink beads according to the chart. Alternate light and bright pink shades where needed to create the colorful border.
Step 6: Build the Ghost Face
Introduce black, white, and gray beads as you move down each strand. Carefully follow the pattern to shape the eyes, elongated face, and open mouth.
Step 7: Complete Each Strand
Continue threading beads until every column reaches its required length. Compare neighboring rows frequently to keep the image aligned.
Step 8: Secure the Bottom
Tie firm knots beneath the final beads. Leave short black cord ends hanging below the tapestry to create the loose fringe visible in the design.
Step 9: Finish and Display
Check the overall alignment and gently straighten uneven strands. Add a hanging cord to both ends of the dowel, then display the finished tapestry on a wall.
2. Rainbow Heart Bead Tapestry Wall Hanging
Description
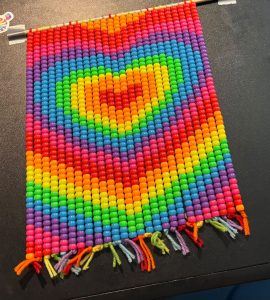
This cheerful bead tapestry features a large rainbow heart surrounded by flowing bands of vivid color. Glossy pony beads in red, orange, yellow, green, blue, purple, and pink create a playful pixelated design. Coordinating yarn tassels add texture along the bottom, while the wooden dowel provides simple support. It makes a colorful decoration for bedrooms, craft rooms, or creative spaces.
Materials
- Pony beads in red, orange, yellow, green, blue, purple, and pink
- Matching colored yarn or sturdy cord
- Wooden dowel
- Scissors
- Measuring tape or ruler
- Graph paper
- Pencil or colored markers
- Bead sorting containers
- Optional hanging cord
Step-by-Step Guide
Step 1: Design the Rainbow Heart
Draw a pixel-style heart on graph paper. Surround the central shape with repeating rainbow bands, using each square to represent one bead.
Step 2: Organize the Colors
Separate all pony beads by shade. Arrange them in rainbow order so you can quickly select each color while following the pattern.
Step 3: Cut the Hanging Strands
Measure and cut enough yarn or cord for every vertical column. Include extra length at both ends for knots and decorative tassels.
Step 4: Attach Strands to the Dowel
Tie each cord securely around the wooden dowel. Keep the strands close together and evenly spaced to create a dense tapestry.
Step 5: Thread the Upper Pattern
Begin adding beads from the top of each strand. Follow the chart carefully as the colorful bands gradually form around the heart.
Step 6: Build the Central Heart
Continue threading red, orange, yellow, and green beads to define the heart, then surround it with blue, purple, pink, and additional rainbow sections.
Step 7: Complete the Lower Design
Extend the rainbow pattern toward the bottom, checking neighboring strands frequently to maintain smooth curves and consistent color transitions.
Step 8: Secure the Beadwork
Tie strong knots beneath the final beads. Make sure every strand is secure before trimming excess cord.
Step 9: Create Colorful Tassels
Leave short pieces of coordinating yarn beneath selected strands. Trim them to similar lengths while keeping their handmade, slightly varied appearance.
Step 10: Finish the Wall Hanging
Straighten the bead columns, adjust uneven sections, and attach an optional cord to the wooden dowel for easy wall display.
3. Wildflower Meadow Bead Tapestry Hanging
Description
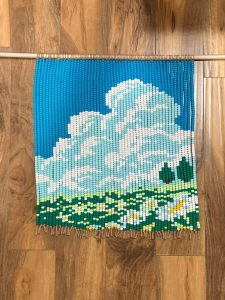
This refreshing bead tapestry captures a peaceful wildflower meadow beneath dramatic summer clouds. Turquoise beads form the bright sky, while layers of white and pale blue create billowing cloud shapes. Deep green fields, scattered daisies, yellow centers, and distant trees complete the landscape. Natural cord fringe and a wooden dowel give this colorful handmade piece a charming rustic finish.
Materials
- Pony beads in turquoise blue
- White pony beads
- Pale blue beads
- Dark green beads
- Light and lime green beads
- Yellow beads
- Natural beige cord or sturdy yarn
- Wooden dowel
- Scissors
- Measuring tape
- Graph paper and colored pencils
- Bead sorting containers
- Optional hanging cord
Step-by-Step Guide
Step 1: Draw the Landscape Pattern
Create a pixel-style chart featuring a blue sky, large clouds, distant trees, green meadow, and scattered white daisies. Let each square represent one bead.
Step 2: Organize the Beads
Separate the beads by color. Keep similar shades apart so the pale cloud blues and different meadow greens remain easy to identify.
Step 3: Prepare the Cord Strands
Cut equal lengths of natural cord for the vertical bead columns. Leave additional cord at both ends for attaching the tapestry and forming fringe.
Step 4: Attach Cords to the Dowel
Loop each strand securely around the wooden dowel. Position them closely together to produce the dense, curtain-like structure of the tapestry.
Step 5: Create the Blue Sky
Thread turquoise beads down the upper portions of the strands, following the chart to establish the broad background.
Step 6: Shape the Billowing Clouds
Introduce white and pale blue beads gradually. Follow the pixel pattern to build overlapping cloud formations with softly defined highlights and shadows.
Step 7: Add the Distant Trees
Use dark and lighter green beads near the horizon to form the small tree silhouettes and transition from sky into meadow.
Step 8: Build the Wildflower Meadow
Continue with several green shades across the lower section. Scatter white beads throughout the field and place yellow beads at their centers to create tiny daisies.
Step 9: Secure the Bottom Fringe
Tie each cord firmly beneath its final bead. Leave short lengths hanging below, then trim them into a slightly relaxed natural fringe.
Step 10: Straighten and Display
Gently align the bead strands so the landscape appears continuous. Check the knots, straighten the fringe, and hang the finished tapestry from its wooden dowel.
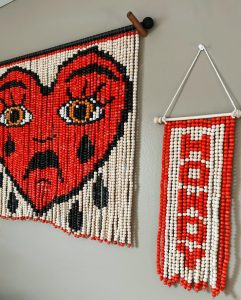
4. Sacred Heart Bead Tapestry Wall Art
Description
This dramatic bead tapestry features a bold sacred heart motif rendered in vivid red, black, cream, and golden orange beads. Large expressive eyes, radiating details, and graphic outlines give the design a striking folk-art character. Beside it, a smaller vertical tapestry carries a coordinating symbolic pattern. Wooden dowels and simple cords complete both pieces with an authentic handcrafted finish.
Materials
- Pony beads in red, black, cream or white, and orange
- Strong black, white, or natural beading cord
- Wooden dowels
- Scissors
- Measuring tape or ruler
- Graph paper
- Colored pencils or markers
- Bead sorting trays
- Optional hanging cord
- Small hooks for wall display
Step-by-Step Guide
Step 1: Create the Bead Pattern
Draw the heart design on graph paper using a pixel-style grid. Mark the red heart, black outlines, cream background, eyes, and orange accents individually.
Step 2: Sort the Bead Colors
Place red, black, cream, and orange beads into separate containers. Organizing everything beforehand helps prevent mistakes while constructing detailed sections.
Step 3: Measure the Hanging Strands
Cut enough cord pieces for all vertical columns. Make each strand slightly longer than the intended tapestry so there is room for knots.
Step 4: Secure Cords to the Dowel
Loop the cords evenly around a sturdy wooden dowel. Keep each strand close to its neighbor so the finished image appears continuous.
Step 5: Begin the Cream Background
Thread cream beads onto the outer strands while gradually introducing red and black beads according to the pattern.
Step 6: Form the Sacred Heart
Build the large red heart one column at a time. Use black beads to create its strong outlines, interior details, facial features, and decorative accents.
Step 7: Add the Expressive Eyes
Carefully arrange cream, black, and orange beads to form the two prominent eyes. Check both sides frequently to maintain balanced proportions.
Step 8: Complete the Surrounding Details
Continue adding cream and black beads around the heart, following the chart to reproduce the radiating graphic shapes and border.
Step 9: Make the Smaller Hanging
Use the same threading technique for the narrow companion tapestry, arranging red and cream beads into its vertical symbolic pattern.
Step 10: Secure and Display
Tie firm knots beneath the final beads, trim excess cord, and straighten each column. Add hanging cords to the dowels before displaying the finished pieces together.
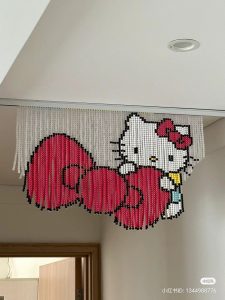
5. Hello Kitty Pink Bow Bead Tapestry
Description
This playful bead tapestry features Hello Kitty surrounded by oversized pink bows in a charming pixel-art composition. White beads shape her recognizable face, while black outlines define the whiskers and details. Bright pink, yellow, and pale blue accents add cheerful contrast. Suspended from closely arranged strands, the design creates a whimsical beaded curtain perfect for bedrooms, doorways, or creative spaces.
Materials
- Pony beads in white, black, bright pink, yellow, and pale blue
- Strong white or clear beading cord
- Wooden dowel or curtain rod
- Scissors
- Measuring tape or ruler
- Graph paper
- Colored pencils or markers
- Bead sorting containers
- Hooks or mounting hardware
Step-by-Step Guide
Step 1: Create the Pixel Pattern
Draw the character and oversized bows on graph paper. Use individual squares to represent beads and mark each required color before beginning.
Step 2: Sort the Beads
Separate white, black, pink, yellow, and pale blue beads into containers. Keep them within easy reach for faster threading.
Step 3: Prepare the Strands
Cut multiple lengths of strong cord according to the height of each section. Allow extra cord for attaching and securing the finished strands.
Step 4: Attach the Cords
Secure each strand closely along a wooden dowel or curtain rod. Maintain consistent spacing so the completed picture remains clear.
Step 5: Form the White Background
Begin threading white beads across the upper strands, leaving the necessary spaces where the character and bow outlines gradually appear.
Step 6: Build the Pink Bows
Follow the chart to create the three oversized bows with bright pink beads. Add black beads around their edges to produce crisp pixel-style outlines.
Step 7: Create the Character
Thread white beads for the head and body, then introduce black beads for the ears, eyes, whiskers, and exterior contours.
Step 8: Add Colorful Details
Place yellow beads for the nose and clothing accent, pale blue beads for the outfit, and pink beads for the signature head bow.
Step 9: Complete the Lower Edges
Finish each strand according to the pattern rather than making every column identical in length. This preserves the recognizable silhouettes of the bows and character.
Step 10: Secure and Hang
Tie sturdy knots beneath the final beads, trim unnecessary cord, and straighten the strands. Mount the finished tapestry securely above a doorway, wall opening, or decorative display area.
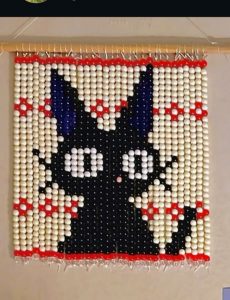
6. Black Cat Mushroom Bead Tapestry
Description
This whimsical bead tapestry features a mysterious black cat surrounded by playful red-and-white mushrooms. Cream beads create a soft neutral background, while deep blue inner ears and oversized white eyes give the feline expressive character. Bold red borders frame the composition beautifully. Suspended from a simple wooden dowel, this handmade design brings woodland charm and quirky personality to any creative space.
Materials
- Pony beads in black, cream, white, red, and dark blue
- One small pink bead for the nose
- Strong white or clear beading cord
- Wooden dowel
- Hanging cord
- Scissors
- Measuring tape or ruler
- Graph paper
- Colored pencils or markers
- Bead sorting containers
Step-by-Step Guide
Step 1: Draw the Pattern
Create a pixel grid showing the central black cat, surrounding mushrooms, cream background, and red border. Assign one bead to each square.
Step 2: Organize the Beads
Separate every bead color into individual containers. Keep black and cream beads especially accessible because they cover most of the tapestry.
Step 3: Prepare the Hanging Cords
Cut equal lengths of strong cord for the vertical columns. Leave enough additional length at both ends for secure knots.
Step 4: Attach Cords to the Dowel
Tie each strand evenly across the wooden dowel. Position the cords closely together to create a compact, continuous beaded surface.
Step 5: Create the Upper Border
Thread a row of bright red beads across the top, then begin adding cream beads to establish the background.
Step 6: Form the Cat Silhouette
Introduce black beads according to the chart, gradually shaping the pointed ears, head, body, paws, and curled tail.
Step 7: Add the Facial Details
Use white and black beads to create the large eyes. Add dark blue inside the ears and place a tiny pink bead at the center for the nose.
Step 8: Build the Mushrooms
Arrange red beads into mushroom caps around the cat. Add small cream or white spots and use lighter beads to form their stems.
Step 9: Finish the Lower Border
Continue the pattern to the bottom and complete it with another strong red row. Tie each strand securely beneath its final bead.
Step 10: Add the Hanging Cord
Trim loose ends neatly, straighten the bead columns, and attach cord to both ends of the wooden dowel. Hang the tapestry where its playful cat-and-mushroom design can stand out.
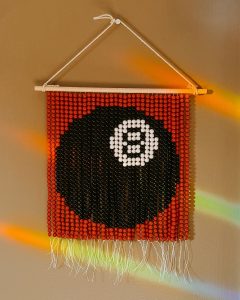
7. Magic Eight Ball Bead Tapestry
This bold bead tapestry transforms the classic magic eight ball into playful retro wall art. Glossy black beads shape the oversized ball, while crisp white pieces create the circular number eight. A vibrant red background provides dramatic contrast and a vintage arcade-inspired mood. Loose white fringe, a wooden dowel, and simple hanging cord complete the handmade statement piece with personality.
Materials
- Black pony beads
- Bright red pony beads
- White pony beads
- Strong white beading cord
- Wooden dowel
- Cotton rope for hanging
- Scissors
- Measuring tape or ruler
- Graph paper
- Pencil and colored markers
- Bead sorting containers
Step-by-Step Guide
Step 1: Draw the Eight Ball Pattern
Sketch a large circular eight ball on graph paper. Add the white number-eight emblem near the upper-right area and surround the ball with a red background.
Step 2: Organize the Beads
Separate black, red, and white beads into individual containers. Keep plenty of black beads nearby because they form most of the central design.
Step 3: Cut the Beading Cords
Measure and cut equal lengths of strong white cord for every vertical column. Leave extra material at both ends for attaching and finishing.
Step 4: Attach Cords to the Dowel
Tie each cord securely around the wooden dowel. Keep the strands evenly spaced and close together so the bead pattern forms a solid image.
Step 5: Build the Red Background
Start threading red beads from the top. Continue downward until the black outline of the eight ball begins according to your chart.
Step 6: Shape the Black Ball
Introduce black beads gradually to create the rounded silhouette. Follow the grid carefully to maintain smooth pixel-style curves along both sides.
Step 7: Create the Number Eight
Use white beads to form a circular emblem inside the black area. Arrange additional black and white beads within it to produce the recognizable number eight.
Step 8: Complete the Lower Pattern
Continue alternating black and red beads until the rounded ball closes near the bottom. Finish the remaining background with red beads.
Step 9: Secure the Fringe
Tie each strand firmly below its final bead. Leave several inches of white cord exposed and trim the ends loosely to create the delicate fringe.
Step 10: Add the Hanger
Tie cotton rope securely around both ends of the wooden dowel. Straighten the bead columns and hang the finished tapestry from a sturdy wall hook.
8. American Flag Patriotic Bead Tapestry
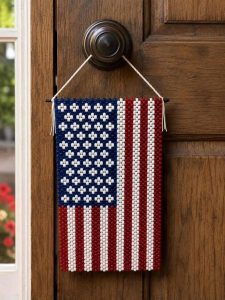
This patriotic bead tapestry recreates the American flag with rich red, white, and deep blue beads. Small white crosses arranged across the blue field suggest a charming handcrafted interpretation of stars, while alternating vertical stripes complete the familiar design. Its compact rectangular shape, simple hanging cord, and slim dowel make this decorative piece ideal for doors, walls, porches, or seasonal displays.
Materials
- Deep blue pony beads
- Red pony beads
- White pony beads
- Strong white beading cord
- Slim wooden or metal dowel
- Cotton rope for hanging
- Scissors
- Measuring tape or ruler
- Graph paper
- Red and blue markers
- Bead sorting containers
Step-by-Step Guide
Step 1: Create the Flag Pattern
Draw a rectangular grid for the tapestry. Mark a blue section in the upper-left corner and plan alternating red and white vertical stripes across the remaining areas.
Step 2: Plan the White Details
Inside the blue field, arrange small cross-shaped clusters of white beads. Space each motif evenly to create the decorative star-inspired pattern.
Step 3: Sort the Beads
Separate the red, white, and blue pony beads into individual containers. Prepare enough of each shade before beginning the project.
Step 4: Prepare the Cords
Cut equal lengths of strong beading cord for every vertical column. Leave additional cord at the top and bottom for secure finishing.
Step 5: Attach Strands to the Dowel
Tie each cord closely along the slim dowel. Maintain consistent spacing so neighboring bead columns sit neatly beside one another.
Step 6: Build the Blue Field
Thread deep blue beads onto the left-side strands, adding small white bead clusters according to the pattern to form the decorative motifs.
Step 7: Create the Upper Stripes
On the right side, alternate columns of red and white beads. Keep each stripe consistent in width as you work downward.
Step 8: Complete the Lower Stripes
Below the blue field, continue the red-and-white striped arrangement across the full width of the tapestry.
Step 9: Secure the Beadwork
Tie firm knots beneath the final beads and trim excess cord neatly. Check that every strand remains evenly tensioned and aligned.
Step 10: Add the Hanging Cord
Attach cotton rope to both ends of the dowel, forming a centered triangular hanger. Straighten the finished tapestry before displaying it on a door or wall.
9. Cardinal Bird Bead Tapestry Hanging
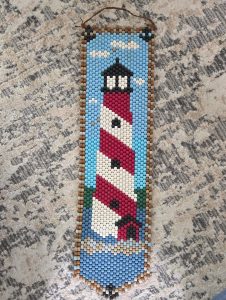
This charming bead tapestry features a bright red cardinal perched against a peaceful blue sky. Cream beads create snowy highlights across the bird’s body, while black details shape its head, eye, and markings. Green foliage and layered blue tones add depth near the base. Finished with earthy brown borders and a hanging cord, this handcrafted piece brings woodland warmth indoors.
Materials
- Pony beads in red or burgundy
- Light blue and medium blue pony beads
- Cream or ivory pony beads
- Black pony beads
- Dark green pony beads
- Brown and tan pony beads
- Strong brown or clear beading cord
- Small wooden dowel or sturdy top rod
- Brown cord for hanging
- Scissors
- Measuring tape
- Graph paper and colored pencils
- Bead sorting containers
Step-by-Step Guide
Step 1: Draw the Cardinal Pattern
Create a narrow vertical grid featuring the cardinal in the center. Plan the blue sky, white cloud details, green foliage, brown border, and curved lower edge.
Step 2: Organize the Bead Colors
Sort the beads into separate containers. Keep similar blue and brown shades apart so the background and border remain clearly defined.
Step 3: Prepare the Vertical Strands
Cut sturdy cord into lengths suitable for each bead column. Account for the tapered bottom by making the central strands slightly longer.
Step 4: Establish the Brown Border
Begin with earthy brown beads along both outer edges. These columns create a rustic frame around the colorful bird scene.
Step 5: Build the Blue Sky
Thread light blue beads throughout the upper background. Add scattered cream beads to create small stylized clouds behind the cardinal.
Step 6: Shape the Cardinal
Use burgundy and red beads to construct the bird’s body. Introduce black beads around the head and within the body for distinctive markings.
Step 7: Add Cream Wing Details
Arrange ivory beads diagonally across the cardinal to form layered wing and feather highlights. Follow the grid carefully to maintain the flowing shapes.
Step 8: Create the Lower Landscape
Add dark green beads beside the bird for foliage, then introduce medium blue, tan, cream, and brown rows beneath the scene.
Step 9: Form the Tapered Bottom
Gradually shorten the outer bead columns while extending the center strands. Finish with blue, brown, cream, and black beads to create the rounded point.
Step 10: Secure and Hang
Tie every strand securely, trim loose cord, and straighten the beadwork. Attach a rustic brown hanging cord across the top and display the finished cardinal tapestry on a wall.
10. Persimmon Tree Bead Curtain Tapestry
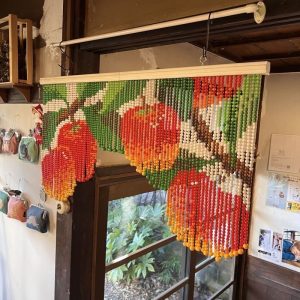
This vibrant bead tapestry depicts ripe persimmons hanging from leafy branches in a lush garden scene. Red, orange, and golden beads create the glowing fruit, while layered greens form dense foliage around twisting brown branches. Cream accents introduce depth and contrast throughout the composition. Its irregular cascading strands transform the design into a decorative curtain with a warm, nature-inspired character.
Materials
- Pony beads in red, orange, and golden yellow
- Dark, medium, and light green pony beads
- Brown pony beads
- Cream or ivory pony beads
- Strong clear or neutral beading cord
- Wide wooden hanging rail or dowel
- Scissors
- Measuring tape
- Graph paper and colored markers
- Bead sorting containers
- Metal hooks or hanging rings
Step-by-Step Guide
Step 1: Plan the Persimmon Pattern
Sketch a wide pixel-style design featuring several hanging persimmons, leafy branches, and open areas beneath the fruit. Use one grid square for each bead.
Step 2: Organize the Colors
Separate the beads into containers by shade. Keep the reds, oranges, yellows, greens, browns, and cream tones organized for easier pattern building.
Step 3: Measure the Hanging Strands
Cut cords in different lengths according to the planned silhouette. Longer strands will form the fruit, while shorter sections create the open spaces between clusters.
Step 4: Attach Strands to the Rail
Secure each cord closely along the wooden hanging rail. Maintain even spacing so neighboring strands combine into a recognizable image.
Step 5: Create the Leafy Canopy
Begin threading several shades of green across the upper section. Mix light and dark tones to suggest overlapping leaves and natural variation.
Step 6: Build the Branches
Introduce brown and cream beads through the greenery to form twisting branches. Follow the chart carefully where branches intersect the fruit.
Step 7: Shape the Persimmons
Use red and orange beads to construct each rounded fruit. Add golden yellow toward the lower edges to create warm tonal transitions.
Step 8: Add Stems and Highlights
Place green beads above each persimmon for leafy tops and stems. Incorporate occasional cream beads to emphasize highlights and surrounding negative space.
Step 9: Form the Cascading Edges
End each strand at its designated length instead of creating a straight bottom. The varied lengths should outline the hanging fruit and foliage naturally.
Step 10: Secure and Display
Tie sturdy knots beneath the final beads and trim excess cord. Straighten the strands, attach hanging rings to the wooden rail, and suspend the finished tapestry above a doorway or window.