The Simple Teacup Bird Feeder I Made to Bring a Little More Nature Into Our Home
There are days when I feel the need to bring our family a little closer to nature, even in the smallest ways. Since we spend so much time on the front porch together, I often look at that quiet corner and think about how to make it feel more alive.
A few weeks ago, while I was rearranging my craft shelf, I found an old teacup and its small matching plate.
They were chipped along the edges, not enough to throw away but not quite nice enough to use again. I held them in my hands and felt that familiar spark that comes when a simple idea appears at the right moment.
I decided to turn them into a bird feeder. I thought it would be a sweet way to bring a bit of nature closer to my child, who loves watching birds flap around in the early morning.
Step 1: Gathering the Materials
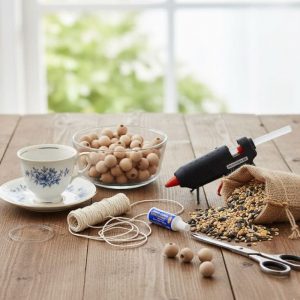
This project is as simple as the idea itself, and I love that it uses things already in my home. I gather:
- an old teacup and matching small plate
- a handful of wooden beads
- strong craft string or fishing line
- super glue or a hot glue gun
- bird seeds
- scissors
Everything fits nicely on the table. The teacup and plate have a faded floral design, and even with the tiny chips, they still look lovely.
Step 2: Gluing the Teacup and Plate Together

I start by flipping the plate upside down and placing a small line of glue around the base of the teacup. I gently press the teacup onto the plate so it leans at a slight angle, creating a little pocket where the seeds will stay.
I hold it steady for a minute so the glue bonds well. Once the glue sets, the whole piece becomes a sweet little feeder.
Step 3: Creating Beaded Hanging Lines
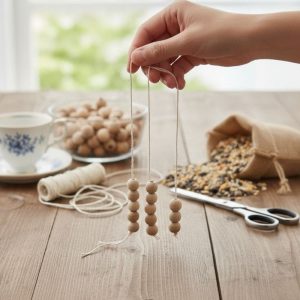
To hang the feeder, I cut three equal lengths of strong craft string. The length depends on how low you want the feeder to hang, but mine are about 45-50 cm each.
I thread a small set of wooden beads onto each string. The beads add a soft, natural touch and give the feeder a handmade look.
When each string is ready, I tie all three ends together at the top, forming a secure loop. Then I glue or tie the opposite ends onto different points around the plate so the feeder stays balanced when hanging.
Step 4: Filling the Teacup With Seeds
After the glue dries completely, I pour bird seeds into the teacup. The angled position keeps the seeds settled inside. I also sprinkle a few seeds along the edges of the plate so birds feel welcome to stop and explore.
Step 5: Hanging the Feeder on the Porch
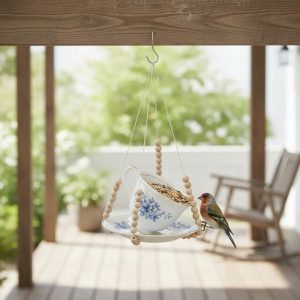
I hang the feeder on a hook near the front porch where we usually sit in the morning. The beads catch the light slightly, and the teacup sways gently when the wind moves. It becomes a tiny spot of life outside our home.
The first day, the birds fly past without stopping, but by the second morning, a curious little sparrow hops onto the edge.
My child notices it before I do and runs to the window, pointing with excitement. Seeing that small moment of joy makes the whole project worth it.