This Year I’m Making My Own DIY Thanksgiving Tree
A few days ago, while reorganizing the top shelf of my craft corner, I found a bundle of faux fall leaves tied together with a loose piece of twine. I had forgotten about them, but as soon as I picked them up, the warm colors felt like a quiet reminder that Thanksgiving was getting close.
The leaves were still crisp, the edges still slightly curled from last year’s project, and seeing them immediately sparked something in me.
I looked at the pile of materials on the shelf, pinecones from our morning walks, leftover chalkboard tags, a roll of twine with the end sticking out, and a burlap sack I used in a project back in spring.
Standing there, I suddenly felt excited in a way I hadn’t felt in a while. I decided on the spot that I wanted to create a Thanksgiving tree as our centerpiece this year.
Preparing the Materials

I waited until my baby’s nap the next day to start gathering everything. The house was quiet except for the soft hum of the washing machine. I spread the materials on the dining table because I wanted to see everything clearly before deciding how to put it together.
I chose:
• a bundle of faux fall leaves
• pinecones I had saved from different seasons
• a few sturdy sticks to form the trunk
• a small round base wrapped in burlap
• chalkboard tags
• twine
• a handful of mini pumpkins
• scissors and glue
I didn’t know exactly how everything would come together, but each piece carried its own little memory.
The pinecones reminded me of weekend walks when the air was still warm. The mini pumpkins were left from a small arrangement I made earlier in the month. Even the burlap had a faint smell of dried lavender from the drawer where it had been stored.
Building the Trunk and Shape of the Tree

To start the tree, I grouped the sticks together and tied them tightly with twine. They weren’t perfectly even, but that worked in my favor as the slight differences made the trunk look more natural. I secured the base so it wouldn’t wobble, pressing it firmly while the glue dried.
Once the trunk felt steady, I began attaching the leaves. This part took the longest because I wanted the tree to look full without making the top too heavy.
As I layered the leaves, I played with the colors, placing the darker reds toward the back and the brighter oranges near the front so the tree would glow even without lights.
I paused every few layers to step back and see the shape from a distance to make sure the tree didn’t lean to one side. Surprisingly, it started looking nicer than I expected.
Adding Pinecones for Texture

The pinecones were my favorite part. Each one felt different to hold as some were smooth and compact, while others had wider, uneven edges. I tucked a few of them between the leaves to add texture, almost like natural ornaments.
Every pinecone changed the shape slightly, so I had to adjust the leaves around them. Instead of frustrating me, the process felt calming.
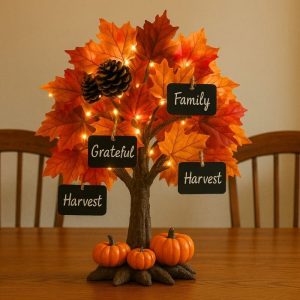
Writing the Chalkboard Tags (The Most Meaningful Part)
After the structure looked full, I sat down with the chalkboard tags. This part took longer than I expected because I wanted each word to feel personal. I wrote: Thankful, Family, Grateful, Harvest, Home, Little Moments.
Each tag felt like a small summary of our year. I tied them gently with twine and hung them on the tree one by one. Seeing those words hanging among the leaves made the tree feel more alive, as if it was holding memories instead of decorations.
Setting the Tree on the Dinner Table
Once the tree was complete, I carried it to the dining table and placed it right in the center. Even without cleaning the surrounding space first, the whole table suddenly felt more festive.
The warm leaf colors brightened the room, and the chalkboard tags added a soft handmade charm that made the tree feel grounded and personal.
I arranged the mini pumpkins around the base, leaving small gaps so the burlap wrapping still showed. Two pinecones sat on each side, completing the look without making it feel overly styled.
A Little Tip You Can Copy
Just to test it, I tucked a short string light into the leaves and turned it on. I didn’t expect much, but the glow surprised me. The orange and red leaves lit up gently, almost like a small sunset in the middle of the table. The tags also shimmered slightly, which made them look even more meaningful.
I decided on the spot that the lights would stay. It was such a simple addition, but it made the whole piece feel warm and inviting, especially in the evening.